Blog

  • Blueberry Lemon Pancakes

    Blueberry Lemon Pancakes

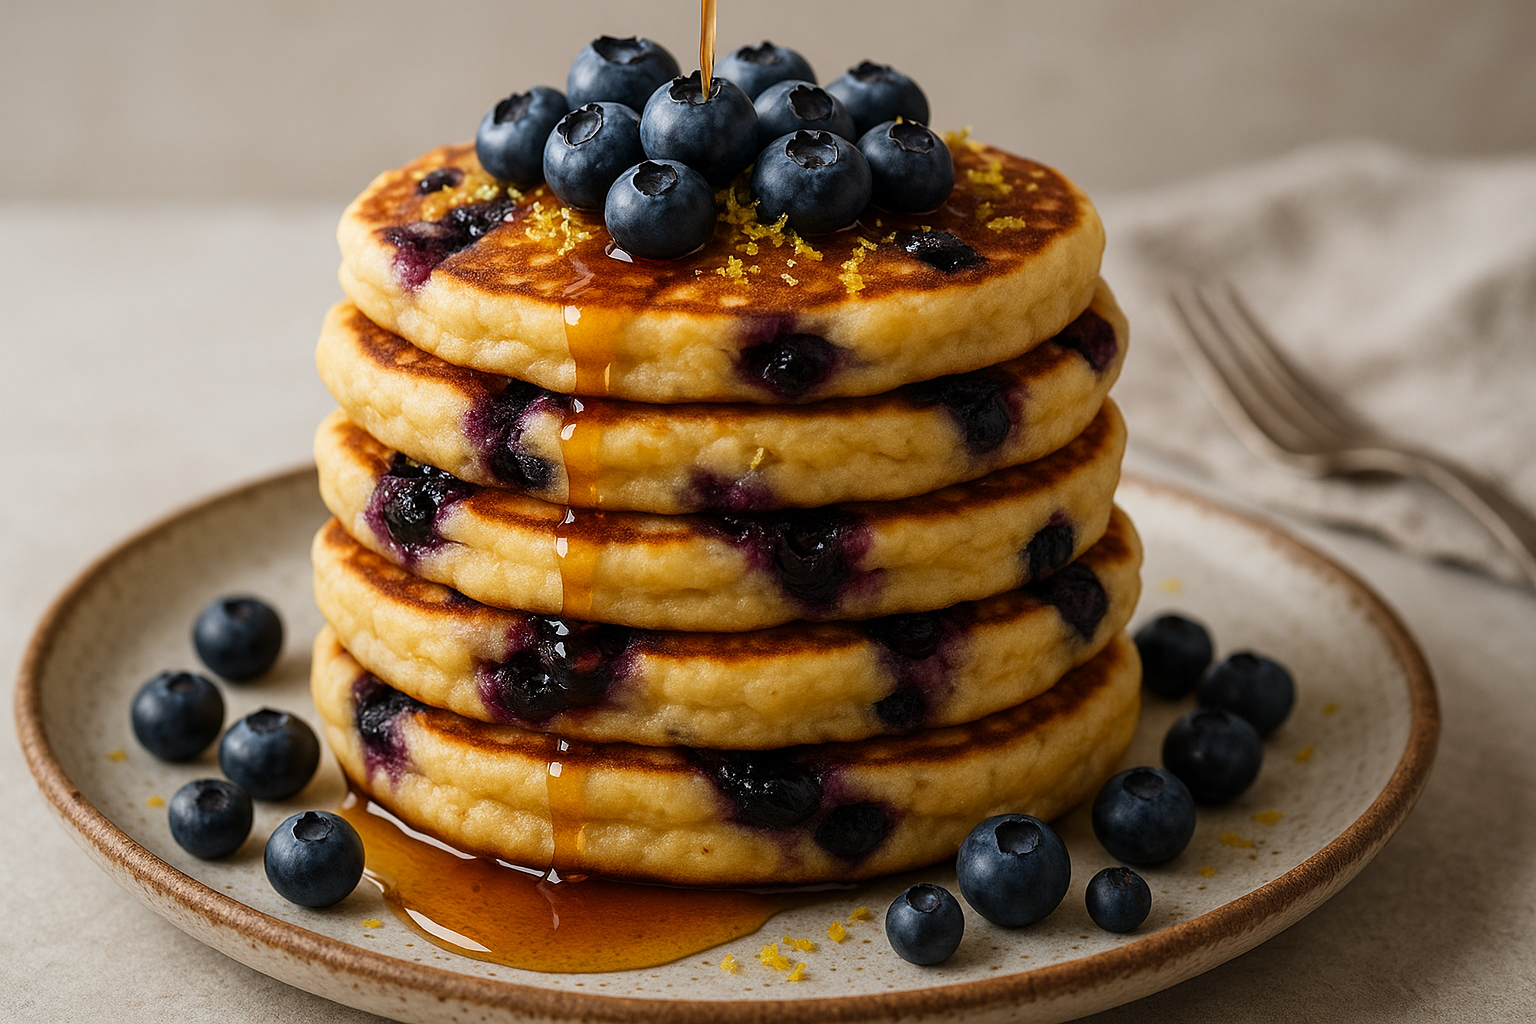
    These are the pancakes that make getting up worth it. Not those floppy, pale, forgettable stacks you get in a greasy spoon. These are thick, golden rounds of lemon-zested fluff loaded with bursting blueberries and dripping with maple syrup. Sharp. Sweet. Soft in the middle, crisp at the edge. The kind of breakfast that demands silence until the last bite.

    You’re working fast and loose with basics here — flour, egg, milk — but what makes these pancakes fly is the balance. The citrus zest electrifies the batter, while the blueberries pop like little flavour bombs. Then there’s the texture — airy and pillowy inside, with that golden shell that comes from just the right amount of heat and butter.

    Cooked in batches, stacked high, and drowned in syrup, they’re dangerously moreish. One stack and you’ll forget cereal ever existed. Make these once and you’ll never go back to boxed mixes again.

    INGREDIENTS

    (Makes 6–8 pancakes, serves 2 hungry or 3 polite people)

    150g plain flour 1 tablespoon caster sugar 1 teaspoon baking powder Pinch of fine salt 1 large egg 200ml whole milk Zest of 1 lemon (plus more for garnish) 1 small handful fresh blueberries (plus extra to serve) Butter, for greasing the pan Maple syrup, to serve

    EQUIPMENT NEEDED

    Large mixing bowl Medium jug or bowl for wet ingredients Whisk Non-stick frying pan or griddle Ladle or large spoon Spatula Microplane or fine grater Serving plates

    STEP-BY-STEP METHOD

    1. Combine the dry ingredients

    In a large bowl, whisk together the plain flour, caster sugar, baking powder, and a pinch of salt. Don’t just stir — whisk. You want everything evenly distributed and aerated before the wet ingredients hit.

    2. Mix the wet ingredients

    In a separate jug or bowl, crack in the egg and add the whole milk. Grate in the zest of one lemon using a microplane for maximum flavour. Whisk until smooth — this should look like a slightly foamy custard base.

    3. Bring the batter together

    Pour the wet mixture into the dry. Now whisk it gently, just until combined. Lumps are fine. In fact, a few lumps mean you haven’t overmixed it — and that’s what keeps the pancakes fluffy, not rubbery.

    Once combined, fold in the fresh blueberries using a spoon or spatula. Don’t crush them — just gently stir them through. If your berries are large, halve them for better distribution.

    4. Heat the pan

    Place a non-stick frying pan or griddle over medium heat. Give it time to get evenly hot — you want a consistent sizzle, not a scorched base. Lightly brush with butter just before the first pancake goes in. Too much and they’ll fry, not brown.

    5. Cook the pancakes

    Using a ladle or large spoon, pour batter into the hot pan — about one ladle per pancake. Leave plenty of space between them. Cook for 2 minutes or until you see bubbles rising and edges starting to set.

    Flip confidently and cook the other side for 1–2 minutes more until golden and cooked through. Adjust the heat if they’re browning too quickly before cooking inside.

    Transfer cooked pancakes to a warm plate and cover lightly with foil. Repeat with the rest of the batter, brushing with a little more butter between batches if needed.

    6. Stack and serve

    Stack the pancakes high on warm plates. Scatter over extra fresh blueberries. Drizzle generously with maple syrup. Grate a final dusting of lemon zest over the top for punch. Serve immediately — hot, golden, and unapologetically indulgent.

    SERVING TIPS

    Serve straight away while they’re hot and fluffy. Add a dollop of yoghurt or a smear of lemon curd if you want to push the citrus. Want crunch? Toasted almonds or granola bring texture. Coffee on the side is mandatory.

    Feeding more? Double the recipe and keep batches warm in a low oven (around 100°C) on a lined baking tray.

    CHEF’S NOTES

    The batter:

    Don’t overmix. A few streaks of flour are fine. Over-whisking develops gluten, and gluten kills fluffiness. Lumps disappear during cooking — trust the process.

    The blueberries:

    Fresh berries are best — they burst gently as the pancakes cook. If using frozen, don’t defrost. Just toss them in a little flour before folding in. That stops them from bleeding purple streaks through your batter.

    The lemon zest:

    This is the twist that lifts the whole stack. Zest adds brightness without watering down the batter like juice would. Use a microplane for maximum oil release — that’s where the flavour lives.

    The pan:

    Non-stick is crucial. If you’re using stainless steel, you’ll need more butter and a little more finesse. Keep the heat medium — too hot and the outside burns before the inside sets.

    Make it your own:

    Swap blueberries for raspberries, chopped strawberries, or even dark chocolate chips. Add a teaspoon of vanilla extract to the batter for extra warmth. Want them dairy-free? Use oat milk and coconut oil instead — still fluffy, still banging.

    Batch tip:

    Make a double batch and freeze extras. Once cooled, layer with baking paper and freeze in a bag or container. Reheat in a toaster or dry pan — they spring back like magic.

    FINAL THOUGHT

    This is breakfast that shows up with intention. No sad oats. No beige cereal. Just golden, citrus-spiked fluff with pockets of sweet berry brilliance and syrup cascading down the sides like liquid gold.

    These pancakes aren’t just a morning meal — they’re a reason to get out of bed. And once you’ve mastered them, you’ll never settle for second-best again.

    HEALTH STATS (per serving, 3–4 pancakes with syrup)

    Energy: around 1900kJ (approx. 460kcal)

    Fat: 16g

    Saturates: 6g

    Sugars: 14g

    Salt: 0.6g

    Carbohydrates: 60g

    Protein: 10g

    Fibre: 3g

    DISCLAIMER

    Every effort has been made to ensure the accuracy and clarity of this recipe. However, all individuals are responsible for verifying the ingredients, techniques, and methods they use. Always check packaging labels for the most up-to-date information regarding allergens, cross-contamination risks, and suitability for specific dietary needs, including gluten-free, nut-free, dairy-free, vegetarian, or vegan requirements.

    Nutritional information provided is estimated for guidance only and may vary depending on portion size, specific brands, or substitutions used. It should not be relied upon as medical or nutritional advice. If you have any allergies, intolerances, medical conditions, or dietary concerns, consult a qualified health professional before preparing or consuming any recipe on this site.

    By following this recipe, you acknowledge that you do so at your own risk. The site, its writers, and contributors are not liable for any adverse reactions, ingredient misinterpretations, or accidents in the preparation or consumption of any dishes.

    For full details, please refer to the site’s complete disclaimer and terms of use.

  • Chicken Tikka Masala

    Chicken Tikka Masala

    This is the king of curry night — a rich, fiery, unapologetically creamy bowl of indulgence that doesn’t just rival your local takeaway, it steamrolls it. This chicken tikka masala is the real deal. Bold. Smoky. Deeply spiced. It’s the kind of dish that silences a table and has everyone scraping the last streaks of sauce with torn bits of naan.

    You’re taking juicy chicken thighs, marinating them in yoghurt and spice until they’re packed with flavour, then grilling or searing until they char like tandoor-fired meat. That’s the base. Then you build the sauce — a slow-fried onion base with ginger, garlic, turmeric, and heat, simmered in passata until thick and deep, finished with a swirl of cream that turns it luscious and silky.

    The key here isn’t complexity — it’s control. Timing the marinade. Balancing the spices. Letting the sauce reduce until it clings to the chicken like velvet. One bite and you’ll realise why takeaway menus should fear home kitchens.

    This is how you do comfort food properly. Rich, spiced, and totally dripping with flavour — all for a fraction of what you’d pay at the curry house. Fakeaway? No. This is the main event.

    INGREDIENTS

    (Serves 4)

    For the marinade and chicken:

    500g boneless, skinless chicken thighs, cut into chunks 150g plain yoghurt (full-fat for best flavour) 1 tablespoon lemon juice 1 tablespoon ginger-garlic paste 1 teaspoon ground cumin 1 teaspoon garam masala 1 teaspoon smoked paprika ¾ teaspoon fine salt

    For the sauce:

    2 tablespoons vegetable oil 1 large onion, finely chopped 1 tablespoon ginger-garlic paste 1 teaspoon ground turmeric 1 teaspoon ground coriander 1 teaspoon chilli powder (adjust to taste) 300g passata 100ml double cream 1 teaspoon caster sugar Salt, to taste

    To serve:

    Cooked basmati rice Warm naan bread Fresh coriander (optional)

    EQUIPMENT NEEDED

    Large bowl for marinating Griddle pan, frying pan, or grill Large saucepan Spatula or wooden spoon Chopping board and sharp knife Mixing spoons Measuring spoons

    STEP-BY-STEP METHOD

    1. Marinate the chicken

    Start with the marinade. In a large bowl, mix together the yoghurt, lemon juice, ginger-garlic paste, ground cumin, garam masala, smoked paprika, and salt. Stir until smooth and fragrant. Add the chicken pieces and toss to coat completely.

    Cover and leave to marinate in the fridge for at least 30 minutes. Longer is better — 2 hours is ideal, overnight if you’ve got time. The yoghurt tenderises, the spices penetrate, and the lemon adds brightness.

    2. Sear or grill the chicken

    Once marinated, remove the chicken from the fridge and let it sit at room temperature for 10 minutes — you want even cooking, not fridge-chill on hot metal.

    Heat a griddle or large frying pan over high heat. Brush with oil. Sear the chicken in batches for 3–4 minutes per side until you get a solid char. You’re not cooking it through entirely — just building that smoky, blistered exterior. Transfer to a plate and set aside.

    Alternatively, grill the chicken under a hot grill for about 8 minutes, flipping halfway. Whatever you do, don’t crowd the pan. You want sear, not steam.

    3. Make the masala sauce

    In a clean saucepan, heat 2 tablespoons of vegetable oil over medium heat. Add the finely chopped onion and cook low and slow for about 8–10 minutes, stirring regularly. You want deep golden colour, not burnt bitterness.

    Once the onions are soft and caramelised, add 1 tablespoon of ginger-garlic paste and stir for 1 minute until it sizzles and becomes fragrant. Then add the turmeric, ground coriander, and chilli powder. Fry for another 30 seconds — the spices should darken slightly and start to stick. That’s where the magic starts.

    4. Add the tomato and simmer

    Pour in the passata. Stir to combine everything, scraping up any bits stuck to the bottom of the pan. Season with a pinch of salt. Bring it to a gentle simmer and let it reduce for 10 minutes, uncovered. You want the sauce to thicken and intensify — look for the colour to deepen and small oil bubbles to appear around the edges.

    5. Finish with cream and chicken

    Once the sauce has reduced and smells like it means business, add the cooked chicken pieces and any resting juices. Stir to coat fully.

    Now pour in the double cream and the teaspoon of sugar. Stir gently until the sauce turns a rich orange-pink. Simmer for another 5 minutes on low heat so the flavours marry and the chicken finishes cooking through.

    Taste and adjust seasoning — a pinch more salt or sugar depending on your preference. You’re looking for a balance of heat, depth, and creaminess.

    6. Serve hot

    Spoon the chicken tikka masala into bowls. Serve with hot basmati rice and soft naan to mop up the sauce. If you like, scatter with fresh coriander for a fresh herbal lift.

    SERVING TIPS

    Serve immediately while hot and bubbling. This dish is all about texture — tender chicken, velvety sauce, fluffy rice, and warm, chewy naan. Don’t skip the carbs — this sauce begs to be scooped. If you’re feeding a crowd, serve family-style with rice in one bowl, curry in another, and naan stacked warm and ready.

    Got leftovers? They’ll taste even better the next day. The flavours deepen overnight — just reheat gently with a splash of water or cream to loosen.

    CHEF’S NOTES

    The chicken:

    Chicken thighs are non-negotiable. Juicy, flavourful, and forgiving — perfect for high-heat cooking and slow sauce simmering. If you insist on breast, cut the cooking time in half or you’ll end up with rubber.

    The marinade:

    Yoghurt tenderises the chicken and adds tang. Spices bloom in the acidity. Don’t skip the resting time — 30 minutes minimum to let the flavour sink in. Overnight? That’s when the magic really happens.

    The sauce:

    Take your time frying the onion and spices — this is where depth comes from. Don’t rush or you’ll miss that roasted, aromatic base that makes tikka masala what it is.

    The tomato:

    Passata gives you smoothness and richness. If using chopped tomatoes, blitz them first — texture matters here. A splash of water helps thin it if it gets too thick before the cream goes in.

    The cream:

    Double cream is what gives this dish its iconic velvety finish. You can use single cream or coconut milk in a pinch, but don’t go light if you want indulgence.

    Make it spicy:

    Add green chillies to the sauce for more fire. Or serve with a side of mango chutney and pickled red onion to balance the heat.

    Make it vegan:

    Swap the chicken for roasted cauliflower or tofu, use a coconut yoghurt marinade, and finish with coconut cream. Same technique, same depth — totally plant-based.

    FINAL THOUGHT

    This is not a watered-down curry house knock-off. This is how you make tikka masala count — rich, fiery, layered with spice and smoky depth. It’s food that hits hard and hugs after. And when you get it right, you’ll wonder why you ever paid twenty quid for the privilege of something half as good.

    It’s bold. It’s messy. It’s indulgent. And it’s yours — on demand, whenever the craving strikes. That’s not a fakeaway. That’s power.

    HEALTH STATS (per serving, without rice or naan)

    Energy: around 2800kJ (approx. 670kcal)

    Fat: 42g

    Saturates: 17g

    Sugars: 9g

    Salt: 1.6g

    Carbohydrates: 15g

    Protein: 38g

    Fibre: 3g

    DISCLAIMER

    Every effort has been made to ensure the accuracy and clarity of this recipe. However, all individuals are responsible for verifying the ingredients, techniques, and methods they use. Always check packaging labels for the most up-to-date information regarding allergens, cross-contamination risks, and suitability for specific dietary needs, including gluten-free, nut-free, dairy-free, vegetarian, or vegan requirements.

    Nutritional information provided is estimated for guidance only and may vary depending on portion size, specific brands, or substitutions used. It should not be relied upon as medical or nutritional advice. If you have any allergies, intolerances, medical conditions, or dietary concerns, consult a qualified health professional before preparing or consuming any recipe on this site.

    By following this recipe, you acknowledge that you do so at your own risk. The site, its writers, and contributors are not liable for any adverse reactions, ingredient misinterpretations, or accidents in the preparation or consumption of any dishes.

    For full details, please refer to the site’s complete disclaimer and terms of use.

  • Smashed Avocado Toast With Poached Eggs

    Smashed Avocado Toast With Poached Eggs

    This is not a polite breakfast. This is not some sad, token slice of avocado slapped on cardboard bread with a half-hearted egg dumped on top. This is rich. Silky. Loud. A power move disguised as breakfast. You’re taking thick-cut sourdough, toasting it to golden, rustling perfection, smashing buttery ripe avocado with lemon and sea salt, then crowning it with perfectly poached eggs that explode like golden lava when pierced. Finished with chilli flakes and a drizzle of oil — because bland breakfasts are a crime.

    This is the kind of dish that shuts people up mid-bite. The crunch of the toast, the richness of the yolk, the creamy avocado laced with lemon and cracked pepper — every element has a job. No filler. No fluff. Just balance and boldness.

    It’s a dish that only takes ten minutes, but when you do it properly — when every detail is dialled in — it feels like luxury. Like a late brunch in a tucked-away café that knows what it’s doing. This is how you start the day with teeth.

    INGREDIENTS

    (Serves 2)

    2 thick slices of good-quality sourdough 2 large fresh eggs 1 ripe avocado 1 teaspoon lemon juice Sea salt, to taste Freshly cracked black pepper, to taste Chilli flakes, to finish Extra virgin olive oil, for drizzling 1 tablespoon white vinegar (for poaching water)

    EQUIPMENT NEEDED

    Toaster or griddle pan Small saucepan (for poaching) Slotted spoon Mixing bowl Fork or potato masher Paper towels Serving plates

    STEP-BY-STEP METHOD

    1. Toast the bread

    Start with proper bread. Not floppy supermarket slices. Real sourdough. Something with structure and chew. Slice it thick — at least 1.5cm. Toast until the edges go golden and the centre crisps up but still has bite. A toaster works. A hot dry pan works better. Get some colour on it.

    Once toasted, set the slices aside on warm plates. You want them ready for the toppings — no time to mess about once the eggs are cooked.

    2. Heat your poaching water

    Fill a small saucepan with water and bring it to a gentle simmer. You’re not boiling here. You want movement in the water, not chaos. Add a splash of white vinegar — about a tablespoon. This helps the egg whites coagulate quickly, wrapping the yolks in that classic teardrop shape.

    3. Prep your eggs

    Crack each egg into a small cup or ramekin. This gives you control when adding them to the water. Fresh eggs are essential — older eggs spread out and look like ghosts. The yolk should sit proud and high. If it doesn’t, bin it and grab another.

    4. Poach the eggs

    Once the water is gently simmering, use a spoon to swirl it into a vortex. This helps wrap the white around the yolk.

    Lower one egg into the centre of the swirl. Then wait. Don’t touch it. Give it exactly 3 minutes — set a timer. The white will set while the yolk stays rich and runny.

    Lift it out with a slotted spoon and rest on kitchen paper to drain. Repeat with the second egg. Poach them separately if you’re not confident — better one perfect than two tangled messes.

    5. Smash the avocado

    In a bowl, scoop out the flesh of a ripe avocado. It should yield slightly to pressure — no rock-hard underripe nonsense. Add a good squeeze of lemon juice, a pinch of flaky sea salt, and a few turns of black pepper.

    Now mash. Not too smooth — you want texture. Fork marks. Chunks. It should look rustic and intentional, not like baby food. Taste and adjust the seasoning. A touch more lemon? Go for it. This is your base layer — make it sing.

    6. Build the toast

    Spread the smashed avocado generously across the toasted sourdough. Don’t be stingy. Cover edge to edge. Let it pile up a little in the centre. Texture is your friend here.

    Now crown each slice with a poached egg. Gently place it — don’t plonk. That yolk is precious.

    7. Finish strong

    Sprinkle over a pinch of chilli flakes for heat and edge. Then drizzle with high-quality extra virgin olive oil. Don’t overdo it — just enough to glisten and add richness.

    Now stand back. Admire the contrast. Crisp toast, green avocado, golden egg, red chilli. Then crack that yolk and let it flood. That’s breakfast done properly.

    SERVING TIPS

    Serve immediately, while the toast is hot and the yolk is still runny. Don’t wait. This dish waits for no one. Pair with black coffee or a sharp green juice to cut the richness. Want to elevate? Add a few pickled red onions, a crumble of feta, or even a strip of crispy bacon if you’re bending the rules.

    CHEF’S NOTES

    The toast:

    Good bread is everything. Sourdough gives chew, tang, and holds up under pressure. A seeded rye or thick-cut wholegrain also works. Just don’t go soft. You need structure to handle the toppings.

    The avocado:

    Use ripe, not overripe. If it’s too soft and starting to brown, bin it. Add lemon to preserve colour and cut through the richness. Want extra zing? Add a teaspoon of finely chopped fresh herbs like coriander or chives.

    The eggs:

    Freshness is non-negotiable. The older the egg, the more it spreads. If in doubt, crack it into a sieve to remove excess watery whites before poaching. Three minutes is the sweet spot for runny yolks. If you like them firmer, go to four.

    The finish:

    Chilli flakes add heat, but use restraint — you want sparkle, not fire. Olive oil adds richness, but only if it’s good quality. Sharp, peppery oil brings it home.

    Make it your own:

    Swap lemon for lime for a twist. Add grilled tomatoes or roasted mushrooms on the side. Or go all out with truffle oil and shaved parmesan for a proper indulgent brunch.

    Meal prep tip:

    Avocado mash can be made an hour ahead if you cover it with cling film directly touching the surface. Eggs can be poached ahead and reheated in warm water for 30 seconds before serving.

    FINAL THOUGHT

    This is how you take a simple concept and elevate it through detail. Every part of this dish is intentional. The toast has crunch. The avocado brings cream and tang. The egg adds richness and theatre. And when it all comes together, it’s not just breakfast. It’s a statement.

    Once you’ve nailed this, you’ll never look at a café brunch menu the same way again. Why pay fifteen quid when you can do it better at home — with more attitude and flavour to boot?

    HEALTH STATS (per serving)

    Energy: around 1800kJ (approx. 430kcal)

    Fat: 28g

    Saturates: 5g

    Sugars: 2g

    Salt: 0.8g

    Carbohydrates: 27g

    Protein: 14g

    Fibre: 6g

    DISCLAIMER

    Every effort has been made to ensure the accuracy and clarity of this recipe. However, all individuals are responsible for verifying the ingredients, techniques, and methods they use. Always check packaging labels for the most up-to-date information regarding allergens, cross-contamination risks, and suitability for specific dietary needs, including gluten-free, nut-free, dairy-free, vegetarian, or vegan requirements.

    Nutritional information provided is estimated for guidance only and may vary depending on portion size, specific brands, or substitutions used. It should not be relied upon as medical or nutritional advice. If you have any allergies, intolerances, medical conditions, or dietary concerns, consult a qualified health professional before preparing or consuming any recipe on this site.

    By following this recipe, you acknowledge that you do so at your own risk. The site, its writers, and contributors are not liable for any adverse reactions, ingredient misinterpretations, or accidents in the preparation or consumption of any dishes.

    For full details, please refer to the site’s complete disclaimer and terms of use.

  • Thai Basil Chicken

    Thai Basil Chicken

    Let’s get one thing straight — this isn’t your average stir-fry. This is high-heat, high-flavour, wok-charred brilliance, born in Bangkok backstreets and built to slap your tastebuds awake. Thai basil chicken, or pad kra pao gai, is the kind of dish that comes together so fast it feels like a trick. But don’t be fooled — it’s all about precision. Timing. Balance. Fire. You’re not throwing ingredients around. You’re orchestrating a blast of heat, salt, sweetness, and fragrance that hits hard and leaves you grinning.

    It starts with a fiery paste — garlic and bird’s eye chillies smashed into a punchy, nose-tingling base. Then comes chicken thigh, chopped fine so it browns fast and stays juicy. Next, a trio of sauces — light soy for seasoning, dark soy for colour and depth, fish sauce for funk. A teaspoon of sugar rounds it out. Finish it with a heroic handful of Thai basil, folded in off the heat so it doesn’t burn — it just wilts and floods the pan with that wild aniseed aroma.

    Serve it over hot jasmine rice with a crispy fried egg — yolk oozing into every corner — and you’ve got ten minutes of work for a result that tastes like it took ten years to perfect. This is weekday cooking that doesn’t compromise. It’s fast. It’s furious. And it absolutely flies.

    INGREDIENTS

    (Serves 2)

    300g boneless, skinless chicken thighs, finely chopped 3 cloves garlic, peeled 2 red bird’s eye chillies (adjust to heat preference) 1 tablespoon vegetable oil (rapeseed or sunflower) 1 tablespoon light soy sauce 1 tablespoon dark soy sauce 1 teaspoon fish sauce 1 teaspoon caster sugar 1 tablespoon water 1 large handful Thai basil leaves (not sweet basil) Cooked jasmine rice, to serve 2 eggs (optional, for crispy fried eggs)

    EQUIPMENT NEEDED

    Sharp knife Chopping board Wok or large frying pan Pestle and mortar (or small food processor) Spatula or wooden spoon Serving bowls

    STEP-BY-STEP METHOD

    1. Smash the garlic and chillies

    Start by peeling the garlic and chopping it roughly. Do the same with the red bird’s eye chillies. Now get brutal. Use a pestle and mortar to smash them together with a small pinch of salt. You’re not looking for a smooth paste — just a rough, chunky mash that releases the oils and aroma. This is the base of your flavour bomb.

    No mortar and pestle? Use the flat side of a knife to crush them into a paste on the chopping board. Just don’t blend — you want texture, not baby food.

    2. Prep the chicken

    Use chicken thighs — they’ve got more flavour and they stay juicy under high heat. Chop them fine, but not to mince. You want small, irregular pieces that’ll catch the heat and develop golden edges. Keep them in a bowl ready to go.

    3. Fry the chilli-garlic paste

    Heat the vegetable oil in a wok or large non-stick frying pan over medium-high heat. Once hot, toss in the garlic-chilli paste. Stir-fry for about 30 seconds. You want to hear it sizzle and smell it immediately — that’s when the oils release and start building depth.

    Keep it moving. Burnt garlic is bitter and unforgivable. If it colours too fast, pull the pan off the heat for a second.

    4. Add the chicken and cook hard

    Throw in the chopped chicken. Turn the heat up to high. Stir constantly, breaking the chicken apart so it cooks evenly. After 5 minutes, it should be browned in places, fully cooked through, and smelling amazing. If the pan’s dry, don’t be afraid to add a splash of oil or water to keep things moving.

    5. Season with the sauces

    Once the chicken is golden and nearly cooked, add your sauces: 1 tablespoon light soy, 1 tablespoon dark soy, 1 teaspoon fish sauce, and 1 teaspoon sugar. Toss it all together fast. The dark soy adds colour and a little sweetness; the fish sauce brings depth and salt; the sugar balances everything out.

    Add a tablespoon of water to loosen the sauce slightly and help it coat every piece of chicken.

    Cook for another 30 seconds so the sauce thickens and glazes the meat. Don’t overdo it — you want the sauce to cling, not pool.

    6. Kill the heat and add Thai basil

    Turn off the heat. Immediately throw in a big handful of Thai basil. Stir it through — the residual heat will wilt it perfectly. You want the leaves vibrant and aromatic, not blackened and sad.

    Thai basil has a sharp, liquorice-like bite that lifts the whole dish. Don’t use Italian basil — it’s completely different. If you can’t get Thai basil, holy basil is even better, if you’re lucky enough to find it.

    7. Serve hot with crispy fried egg

    Spoon the Thai basil chicken over freshly cooked jasmine rice. For the full Thai street food hit, top each bowl with a crispy fried egg: fry eggs in hot oil until the whites are puffed and golden at the edges, yolks still soft and oozy. That rich yolk mingling with the spicy sauce? Game over.

    SERVING TIPS

    Serve immediately while the chicken is hot and the basil is fresh. The egg is optional, but if you skip it, you’re missing a trick — it balances the heat and adds luscious richness. If you’re feeling fancy, garnish with a few extra Thai basil leaves and a crack of black pepper.

    This dish doesn’t need sides — it’s built to stand alone. But if you want to stretch the meal, add a crisp cucumber salad or some stir-fried morning glory.

    CHEF’S NOTES

    The heat:

    Bird’s eye chillies are small but savage. Two give a decent kick without being unbearable. Adjust depending on your tolerance, but don’t remove the chilli altogether — it’s part of the character. And smashing them with garlic releases far more flavour than just slicing.

    The meat:

    Chicken thigh is key. Chicken breast will dry out under high heat and won’t deliver the same flavour. Keep the pieces small and don’t overcrowd the pan — you want fry, not steam.

    The sauce:

    Taste your sauces. Not all soy or fish sauces are created equal. Start with the amounts given, but tweak as you go — if it tastes flat, add more fish sauce. Too sharp? More sugar. Too salty? A splash of water fixes it.

    The basil:

    Thai basil isn’t a garnish — it’s the soul of the dish. Don’t cook it too long or it’ll go limp and dull. Add it at the very end and let the residual heat do the work.

    Make it plant-based:

    Sub in firm tofu or mushrooms instead of chicken. Use a vegan fish sauce alternative or extra soy sauce. The flavour will still slap — it just hits a little differently.

    Batch cooking tip:

    You can prep all the ingredients in advance — even the chilli-garlic paste. But don’t cook until you’re ready to serve. This dish relies on speed and high heat — make it fresh and eat it immediately for best results.

    FINAL THOUGHT

    This is what weeknight cooking should be — fast, filthy, and full of attitude. Ten minutes. One pan. No fuss. And yet the flavour punches way above its weight. Hot. Salty. Sweet. Deeply savoury. With that basil cutting through like a blast of green fire.

    Once you’ve mastered this, you’ll find yourself making it on autopilot. And that’s the danger — you’ll want it every night. No shame in that.

    HEALTH STATS (per serving, without egg)

    Energy: around 1800kJ (approx. 430kcal)

    Fat: 24g

    Saturates: 4.5g

    Sugars: 6g

    Salt: 2g

    Carbohydrates: 12g

    Protein: 38g

    Fibre: 1g

    DISCLAIMER

    Every effort has been made to ensure the accuracy and clarity of this recipe. However, all individuals are responsible for verifying the ingredients, techniques, and methods they use. Always check packaging labels for the most up-to-date information regarding allergens, cross-contamination risks, and suitability for specific dietary needs, including gluten-free, nut-free, dairy-free, vegetarian, or vegan requirements.

    Nutritional information provided is estimated for guidance only and may vary depending on portion size, specific brands, or substitutions used. It should not be relied upon as medical or nutritional advice. If you have any allergies, intolerances, medical conditions, or dietary concerns, consult a qualified health professional before preparing or consuming any recipe on this site.

    By following this recipe, you acknowledge that you do so at your own risk. The site, its writers, and contributors are not liable for any adverse reactions, ingredient misinterpretations, or accidents in the preparation or consumption of any dishes.

    For full details, please refer to the site’s complete disclaimer and terms of use.

  • Crispy Miso Aubergine

    Crispy Miso Aubergine

    Let’s set the record straight — if you still think vegetables are a side act, this dish is here to smack that idea out of your head. This isn’t your limp, lifeless aubergine from a sad salad bar. This is a blistered, bubbling, umami-drenched masterpiece that holds its own against any slab of meat.

    You’re going to take one of the most misunderstood vegetables in the kitchen — aubergine — and turn it into a smoky, sticky, caramelised beast. Deeply roasted until it collapses under a spoon, then glazed in a miso marinade that’s got enough punch to wake up your palate with a slap.

    The key here is technique. Roasting the aubergine cut-side up so the flesh softens while the edges caramelise. Scoring it so every line traps flavour. Then painting on a glaze made with white miso, mirin, soy, rice vinegar, and a whisper of sesame. It’s sweet, sharp, nutty, and fermented — all at once. That bubbling, golden finish? That’s not garnish — that’s intent.

    When it hits the table, it doesn’t whisper “plant-based” — it screams satisfaction. Serve it as a main with jasmine rice or as part of a bigger spread. Just don’t expect leftovers. This is the dish that makes meat-eaters shut up and nod.

    INGREDIENTS

    (Serves 2 as a main or 4 as a side)

    2 medium aubergines 2 tablespoons vegetable oil (rapeseed or sunflower work best) 2 tablespoons white miso paste 1 tablespoon mirin 1 tablespoon rice vinegar 1 teaspoon light soy sauce 1 teaspoon caster sugar 1 teaspoon toasted sesame oil 1 spring onion, finely sliced 1 teaspoon toasted sesame seeds ½ red chilli, finely sliced (optional, for heat and colour)

    EQUIPMENT NEEDED

    Sharp chef’s knife Chopping board Small mixing bowl Baking tray Pastry brush or spoon Oven

    STEP-BY-STEP METHOD

    1. Prepare the aubergines

    Start by preheating your oven to 200°C (fan 180°C). You want consistent, dry heat here — not too aggressive, but enough to give your aubergines some colour without burning the glaze later.

    Take your aubergines and slice them lengthways straight through the stalk. Don’t remove the green tops — they’re not edible, but they help hold the shape. Score the flesh in a deep criss-cross pattern, about 1cm apart, being careful not to cut through the skin. This scoring allows heat and flavour to penetrate deep into the flesh. Think of it like laying tracks for the glaze to follow.

    Now brush the cut surface generously with vegetable oil. Be thorough. Don’t dab. Get that oil into the grooves. Place them cut-side up on a baking tray lined with parchment or foil.

    2. Roast until golden and soft

    Roast the aubergines in the hot oven for 30 minutes. You want them golden, slightly collapsed, and tender right through. The edges should crisp a little, while the inside turns silky. If they still feel firm after 30 minutes, give them another 5. No one wants a chewy aubergine — undercooking ruins the whole thing.

    3. Make the miso glaze

    While the aubergines roast, mix the glaze. In a small bowl, combine 2 tablespoons of white miso paste with 1 tablespoon mirin, 1 tablespoon rice vinegar, 1 teaspoon soy sauce, 1 teaspoon caster sugar, and a teaspoon of toasted sesame oil. Stir until smooth and glossy. The texture should be like warm honey — not too thick, not too runny. Adjust with a splash more mirin if it needs loosening.

    Taste it. It should slap you with sweet, salty, tangy umami. If it doesn’t make your eyebrows lift, tweak it.

    4. Glaze and return to the oven

    Once the aubergines are tender and golden, remove them from the oven. Don’t let them cool — timing is key. While they’re still hot, spoon over the miso glaze. Make sure it seeps into every scored groove and edge. Use the back of a spoon or a pastry brush to spread it evenly.

    Return the tray to the oven for another 10 minutes. This is when the glaze bubbles and caramelises. Keep a close eye in the last few minutes — sugar burns quickly. You want sticky and golden, not scorched.

    5. Finish with garnish

    Take the tray out. Let the aubergines rest for 2 minutes — just enough for the glaze to set slightly. Now hit them with finely sliced spring onion, toasted sesame seeds, and a little chopped fresh red chilli for contrast and heat. If you want to elevate further, add a squeeze of lime or a scatter of crispy shallots.

    SERVING TIPS

    Serve these hot, straight from the tray or plated up on a warm dish. Pair them with jasmine rice, steamed bok choy, or a cold noodle salad. If you’re going full banquet, they sit beautifully alongside grilled tofu, kimchi, or a tangy pickled cucumber.

    These aubergines also work at room temperature — the flavours deepen as they sit. Drizzle with extra sesame oil or soy if you’re serving cold.

    CHEF’S NOTES

    The aubergine:

    Look for firm, shiny aubergines with no bruises. Medium size is ideal — too small, and they dry out; too big, and they get seedy. Scoring is non-negotiable. It helps roast the inside while catching the glaze later.

    The miso:

    White miso is your best friend here — mild, sweet, and complex. Red miso is too strong for this dish. Make sure it’s good quality — cheap miso tastes flat and salty. If you’ve only got dark soy, use half the amount and taste as you go.

    The sesame oil:

    Use toasted sesame oil — the dark, fragrant kind. It brings warmth and depth. Don’t cook with it — it burns easily. It’s for flavour, not frying.

    The glaze:

    Balance is everything. You want sweetness from sugar and mirin, acidity from rice vinegar, and that deep umami punch from the miso. Adjust the ratios depending on your miso’s strength. Always taste and tweak — never glaze blind.

    Garnishes:

    The garnish isn’t an afterthought. The spring onion adds freshness, the sesame seeds give crunch and nuttiness, and the chilli cuts through the richness. Use all three — it makes a difference. And don’t skimp on the chilli if you like a bit of heat.

    Make it a meal:

    This dish holds its own, but you can make it a main event by adding a soft-boiled egg, a scoop of sushi rice, or quick-pickled radish on the side. Want protein? Add grilled tofu or tempeh glazed with the same miso mix. Want crunch? Fried shallots or crushed peanuts take it to another level.

    Make it ahead:

    You can roast the aubergines ahead of time and reheat before glazing. But always glaze and caramelise just before serving — it’s what makes the dish pop. Leftovers keep well for 24 hours in the fridge and reheat beautifully in a hot oven or air fryer.

    FINAL THOUGHT

    This is plant-based cooking without compromise. It doesn’t whisper “healthy” — it roars “flavour.” You’ve got texture, depth, umami, and heat in every mouthful. It’s rich without being heavy. Sticky without being cloying. The kind of dish that makes you scrape the plate clean.

    Once you’ve nailed this, you’ll start seeing aubergines differently. No longer just a filler. They become the centrepiece — bold, indulgent, and absolutely unforgettable.

    HEALTH STATS (per portion, assuming two servings)

    Energy: around 1400kJ (approx. 335kcal)

    Fat: 21g

    Saturates: 2.8g

    Sugars: 9g

    Salt: 1.6g

    Carbohydrates: 20g

    Protein: 5g

    Fibre: 7g

    DISCLAIMER

    Every effort has been made to ensure the accuracy and clarity of this recipe. However, all individuals are responsible for verifying the ingredients, techniques, and methods they use. Always check packaging labels for the most up-to-date information regarding allergens, cross-contamination risks, and suitability for specific dietary needs, including gluten-free, nut-free, dairy-free, vegetarian, or vegan requirements.

    Nutritional information provided is estimated for guidance only and may vary depending on portion size, specific brands, or substitutions used. It should not be relied upon as medical or nutritional advice. If you have any allergies, intolerances, medical conditions, or dietary concerns, consult a qualified health professional before preparing or consuming any recipe on this site.

    By following this recipe, you acknowledge that you do so at your own risk. The site, its writers, and contributors are not liable for any adverse reactions, ingredient misinterpretations, or accidents in the preparation or consumption of any dishes.

    For full details, please refer to the site’s complete disclaimer and terms of use.

    Ready for the next one.

  • The Ultimate Steak Sandwich

    The Ultimate Steak Sandwich

    A beast of a sandwich. Unapologetically rich. Ridiculously juicy. Designed to stop traffic and silence a room.

    Introduction

    Let’s get one thing clear — this isn’t some lazy midday snack slapped together with limp lettuce and a sad slice of ham. This is indulgence in a roll. The ultimate steak sandwich is the heavyweight champion of hot sandwiches. When you bite in, it’s not just food. It’s heat, crunch, juice, fat, acid, and bite — all working together like a symphony led by a flaming baton.

    You’re building layers of flavour from the ground up. Ribeye, thick and marbled, seared with brutal heat until a crust forms. Balsamic onions, cooked low and slow until they melt into sticky gold. Toasted ciabatta that crunches when you tear it. Dijon mustard whispering sharpness against the fat of the meat. Peppery rocket punching through the middle like a green flare.

    This sandwich is for days when you need something bold. Something savage. A steak dinner, compressed into a two-handed masterpiece. Cook it right and you’ll ruin all other sandwiches.

    Ingredients

    (Serves one dangerously hungry human or two polite ones)

    1 thick-cut ribeye steak (approx. 250g, at least 2.5cm thick) sea salt and freshly ground black pepper 1 tablespoon vegetable oil (rapeseed or sunflower) 1 large brown onion, peeled and thinly sliced 1 knob unsalted butter (about 15g) 1 teaspoon good-quality balsamic vinegar 1 fresh ciabatta roll 1 teaspoon Dijon mustard 1 small handful fresh rocket leaves

    Optional extras to elevate further

    a slice of blue cheese or mature cheddar a swipe of garlic mayo or horseradish cream instead of Dijon crisped shallots or toasted pine nuts for texture

    Equipment needed

    large frying pan or cast iron skillet tongs chopping board sharp chef’s knife small spatula or wooden spoon small bowl or tray to rest the steak

    Step-by-step method

    1. Bring the steak to room temperature

    Don’t skip this. You want even cooking edge to edge. If it’s fridge-cold, the centre stays raw while the crust burns. Let it sit out for at least 20 minutes. Pat it dry with kitchen paper — moisture is the enemy of sear.

    2. Season like you mean it

    Generously salt and pepper both sides of the steak. Go bold — this is your crust. Press the seasoning into the surface so it clings. Don’t just sprinkle and hope.

    3. Sear it fast and furious

    Get the pan ripping hot. Add the oil and lay in the steak, away from you. You want that angry hiss — that’s flavour being born. Don’t move it. Let it sear hard for 2 minutes. Flip and give the second side 2 minutes more. Then grab the steak with tongs, stand it on the fatty edge, and render it for 30 seconds until golden and bubbling.

    4. Rest. Always rest.

    Transfer the steak to a warm plate or tray. Let it rest for 5 full minutes. This isn’t optional. Juices need time to redistribute. Slice too soon and they’ll bleed out, leaving you with dry disappointment.

    5. Caramelise the onions

    Turn the heat to medium-low. Drop in the butter. Once foaming, toss in the onions. Stir to coat. Let them cook for 10 minutes, stirring occasionally. They should go golden, soft, and jammy — not burnt. Patience is the price of flavour.

    6. Hit with balsamic

    Once soft and golden, deglaze with balsamic vinegar. Let it bubble for a minute. Use your spoon to scrape up all the sticky goodness from the pan base. That’s where the flavour hides.

    7. Toast the ciabatta

    Split the ciabatta horizontally. Toast the cut side down in a dry pan or under a hot grill. Aim for golden edges, not blackened rubble. Texture is key — you want crunch outside, pillowy inside.

    8. Build it like you mean it

    Spread Dijon mustard across the toasted base. Slice the rested steak thinly, against the grain, and layer it generously. Top with the warm balsamic onions. Let them tumble — don’t flatten or fuss. Finish with fresh rocket for bite and brightness.

    Cap it with the other half of the ciabatta. Press down gently to settle everything into place.

    Serving tips

    Slice the sandwich in half at an angle for maximum visual payoff. Serve hot while the steak is still warm, the onions sticky, and the bread perfectly crisp. Wrap it in paper if you’re on the move — this thing drips with pride. Have napkins nearby. It’s going to get messy. Good.

    Chef’s notes

    The steak:

    Ribeye is king for a reason — fat, flavour, tenderness. Sirloin or rump will work, but tweak your timings. Too lean, and you lose depth. Too thick, and you’ll need to finish it in the oven or risk a raw middle.

    The onions:

    Cook low and slow. This is not the time for rushing. You want deep gold, not burnt brown. The balsamic cuts through the fat and adds just enough acidity to sharpen everything.

    The bread:

    Ciabatta holds up beautifully. But don’t stop there — a sturdy sourdough, baguette, or focaccia all bring their own magic. Just don’t use a soft roll that’ll cave in under pressure. This isn’t a sandwich for weak foundations.

    Elevate it further:

    melt a slice of blue cheese or sharp cheddar over the steak add crispy shallots for crunch toast the roll with garlic butter swipe on horseradish cream for fire You’re not stuck with tradition. Push it.

    Final thought

    This is how you turn a steak into an experience. It’s not just about throwing meat on bread. It’s about balance. Technique. Timing. Acid against fat. Crunch against chew. Heat against cool. You’re not just making lunch — you’re crafting a bite that punches above its weight.

    Once you master this, there’s no going back. And no excuse for a boring sandwich ever again.

    Health stats (per sandwich)

    Energy: around 2700kJ (approx. 650kcal)

    Fat: 35g

    Saturates: 12g

    Sugars: 7g

    Salt: 1.4g

    Carbohydrates: 38g

    Protein: 42g

    Fibre: 3g

    Disclaimer

    Every effort has been made to ensure the accuracy and clarity of this recipe. However, all individuals are responsible for verifying the ingredients, techniques, and methods they use. Always check packaging labels for the most up-to-date information regarding allergens, cross-contamination risks, and suitability for specific dietary needs, including gluten-free, nut-free, dairy-free, vegetarian, or vegan requirements.

    Nutritional information provided is estimated for guidance only and may vary depending on portion size, specific brands, or substitutions used. It should not be relied upon as medical or nutritional advice. If you have any allergies, intolerances, medical conditions, or dietary concerns, consult a qualified health professional before preparing or consuming any recipe on this site.

    By following this recipe, you acknowledge that you do so at your own risk. The site, its writers, and contributors are not liable for any adverse reactions, ingredient misinterpretations, or accidents in the preparation or consumption of any dishes.

    For full details, please refer to the site’s complete disclaimer and terms of use.