Category: Fakeaway

  • Peri Peri Chicken Wrap With Garlic Mayo

    Peri Peri Chicken Wrap With Garlic Mayo

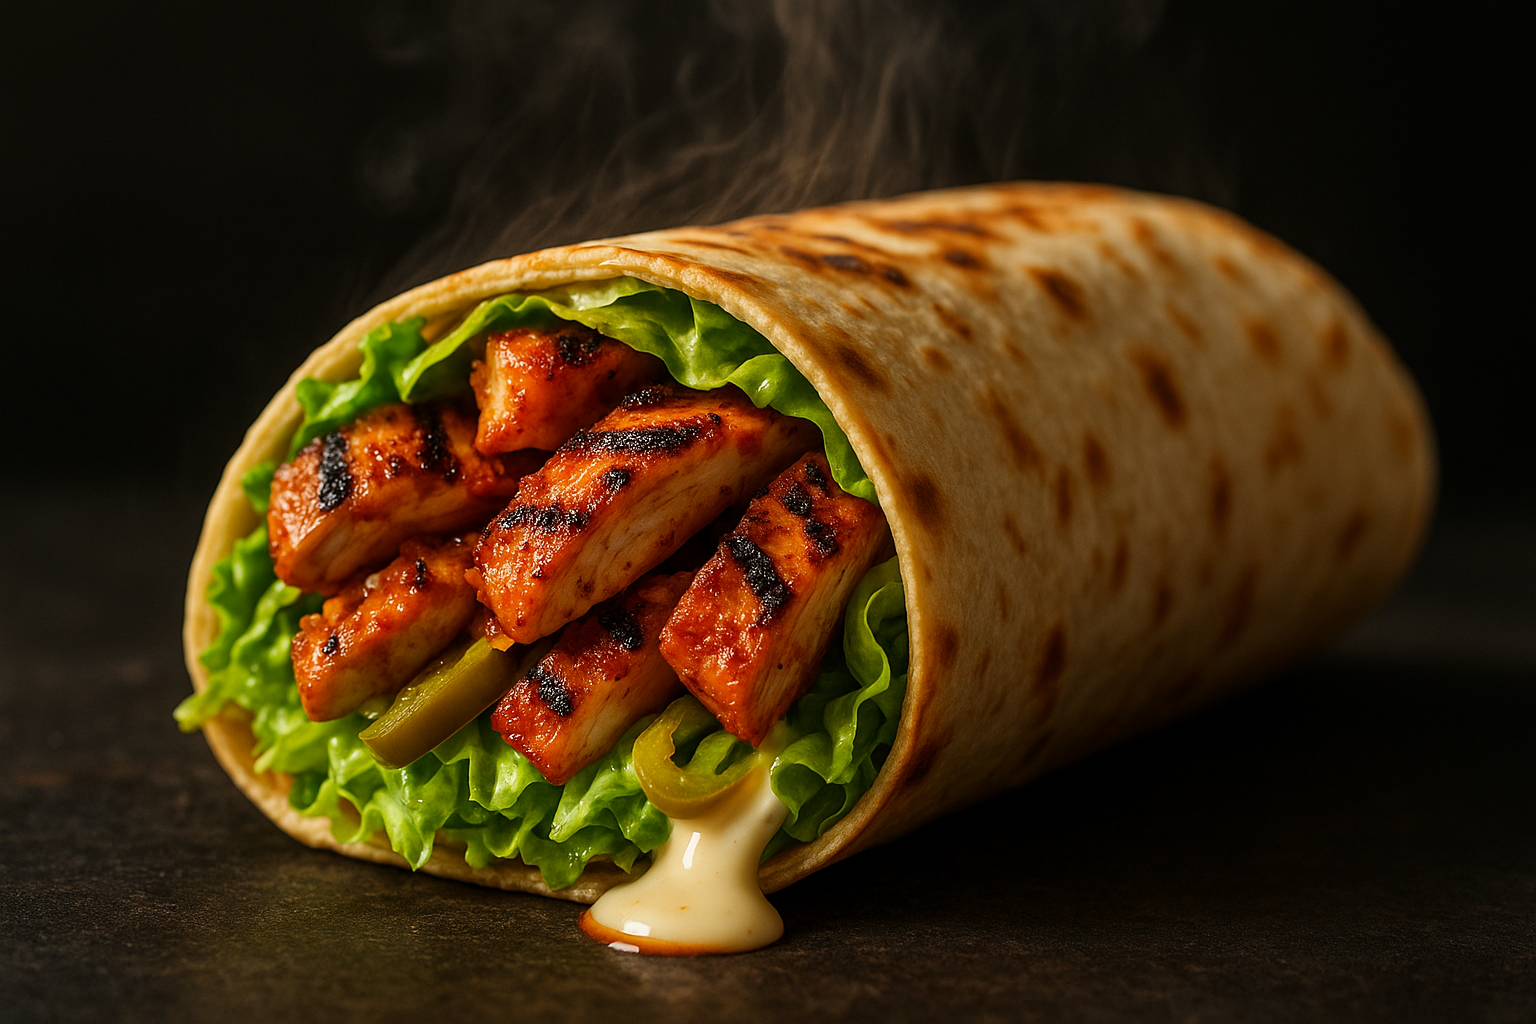
    This wrap doesn’t whisper — it bites back. One juicy chicken breast smashed with peri peri spice, seared until charred and smoky, dripping in garlic mayo, and stuffed into a soft tortilla with pickled chillies and crisp lettuce. It’s hot. It’s sharp. It’s dangerously fast. This isn’t lunch — it’s a fakeaway with fangs. Forget your delivery app. Heat a pan. Light a fire. Wrap with purpose.

    Ingredients

    Serves 1

    1 large boneless, skinless chicken breast 1 tbsp olive oil 1 tsp smoked paprika 1 tsp garlic powder 1 tsp dried oregano Juice of ½ lemon 1 tsp peri peri sauce (hot or medium) 1 large tortilla wrap 1 tbsp garlic mayonnaise 1 handful shredded iceberg lettuce A few pickled chillies (to taste) Pinch of sea salt and black pepper

    Equipment needed

    Sharp knife Chopping board Small bowl for marinade Tongs or spatula Griddle pan or heavy frying pan Non-stick frying pan (for toasting wrap) Citrus juicer (optional)

    Step-by-step method

    1. Prepare the chicken.

    Lay the chicken breast flat on a chopping board and slice horizontally into two thinner pieces. This gives you more surface area, faster cook time, and more flavour per bite.

    2. Build the marinade.

    In a small bowl, combine 1 tablespoon olive oil, 1 teaspoon smoked paprika, 1 teaspoon garlic powder, 1 teaspoon oregano, a good squeeze of lemon juice, and 1 teaspoon peri peri sauce. Add a pinch of salt and pepper. Stir well.

    3. Coat and marinate.

    Rub the chicken fillets thoroughly in the marinade — every crevice, every edge. Let it sit for 10–15 minutes if you’re short on time, or up to 12 hours in the fridge if you want max punch.

    4. Sear it hot.

    Heat a griddle pan until smoking. Add the chicken and cook for 4 minutes on each side. Don’t move it too soon — you want proper char marks. Flip once and cook until the chicken is firm, golden, and cooked through.

    5. Rest and slice.

    Let the cooked chicken rest for 2 minutes on a board. Then slice thinly across the grain. This keeps it juicy and easier to stack.

    6. Warm the tortilla.

    Place the tortilla in a dry non-stick pan for 30 seconds each side until warm and flexible. Don’t skip this — a cold wrap breaks, not bends.

    7. Build the wrap.

    Spread 1 tablespoon garlic mayo across the centre of the tortilla. Add a handful of shredded lettuce. Pile on the sliced peri peri chicken. Add pickled chillies — as many or as few as you can handle.

    8. Wrap and toast.

    Fold the wrap tightly like a burrito. Place it seam-side down in the hot dry pan and toast for 30 seconds each side until sealed, golden, and crisped at the edges.

    9. Slice and serve.

    Cut diagonally and serve immediately — you want that steam, that crunch, that hit of hot garlic and fire.

    Serving tips

    Pair with sweet potato fries or crispy wedges if you’re feeling indulgent. Want balance? Serve with a simple cucumber and tomato salad with lemon juice. Add a spoon of extra garlic mayo or chilli sauce on the side for dunking. Or go next level with caramelised onions and grilled peppers folded into the wrap.

    Chef’s notes

    Char is everything. Don’t crowd the pan. Don’t flip too soon. A hot pan is your best friend — it gives you flavour, texture, and that smoky takeaway vibe without deep frying.

    Wrap smart. Always warm your tortilla. Cold wraps tear, warm wraps flex. Wrap tightly and toast again — that final sear makes the difference between soft and structural.

    Adjust the fire. Swap peri peri sauce for your favourite hot sauce if needed. Add cayenne or chilli flakes to the marinade if you’re chasing heat. Or dial it down with more lemon and yoghurt.

    Batch it. Double or triple the chicken quantities, cook in one go, and store leftovers in the fridge. Makes killer wraps, salads, or rice bowls for up to 3 days.

    Garlic mayo upgrade. Want it punchier? Add a clove of raw garlic (grated) to your mayo and a pinch of smoked paprika for colour and kick.

    Level it up. Add grilled halloumi slices for extra chew and salt. Or fold in caramelised onions and roasted peppers to make it fuller, deeper, more complex.

    Final thought

    This isn’t just a wrap — it’s a weapon. It’s flame-seared chicken and bold garlic mayo tucked into a soft tortilla and toasted till the edges crisp. It’s fakeaway energy at home, faster than your phone can load the app. One pan, zero compromise, all impact. You don’t wait for this — you crave it, you chase it, and once you taste it, you won’t go back.

    Health stats (per serving)

    Each serving comes in around 2,300kJ (550kcal), with 27g fat, 5.5g saturates, 4.6g sugars, and 1.8g salt. You’ll get approximately 39g protein, 35g carbohydrates, and 3.2g fibre — high-protein, high-flavour, and balanced enough to land in your lunch rotation guilt-free.

    Disclaimer

    Every effort has been made to ensure the accuracy and clarity of this recipe. However, all individuals are responsible for verifying the ingredients, techniques, and methods they use. Always check packaging labels for the most up-to-date information regarding allergens, cross-contamination risks, and suitability for specific dietary needs, including gluten-free, nut-free, dairy-free, vegetarian, or vegan requirements.

    Nutritional information provided is estimated for guidance only and may vary depending on portion size, specific brands, or substitutions used. It should not be relied upon as medical or nutritional advice. If you have any allergies, intolerances, medical conditions, or dietary concerns, consult a qualified health professional before preparing or consuming any recipe on this site.

    By following this recipe, you acknowledge that you do so at your own risk. The site, its writers, and contributors are not liable for any adverse reactions, ingredient misinterpretations, or accidents in the preparation or consumption of any dishes.

    For full details, please refer to the site’s complete disclaimer and terms of use.

  • Chicken Chow Mein Fakeaway

    Chicken Chow Mein Fakeaway

    This chow mein doesn’t imitate your local — it obliterates it. Glossy, smoky, loaded with slick noodles and tender chicken, all firing off with garlic, soy, and wok char. It’s chewy, saucy, and umami-stacked. The veg snaps, the noodles bite, and the flavour hits like a late-night craving finally answered. You get the heat, the speed, the sizzle — without the grease trap or the wait. Every toss in the wok builds another layer of flavour. This isn’t fakeaway — it’s takeover. It’s hotter, fresher, and faster than anything in a plastic tub. Cook it once and you’ll never look back.

    Ingredients

    Serves 2

    150g dried egg noodles 200g chicken breast, thinly sliced 1 tsp light soy sauce (for marinade) 1 tsp cornflour Dash of sesame oil 1 tbsp neutral oil (vegetable or groundnut) 1 medium onion, sliced 1 handful shredded cabbage 1 medium carrot, julienned 1 tbsp dark soy sauce 1 tbsp oyster sauce Pinch white pepper

    Equipment needed

    Large pot for noodles Sieve or colander Sharp knife and chopping board Mixing bowl Wok or large non-stick frying pan Tongs or heatproof spatula

    Step-by-step method

    1. Cook the noodles.

    Bring a large pan of water to the boil. Drop in 150g of dried egg noodles and cook for 3 minutes or until tender with bite. Stir once to separate. Immediately drain and rinse under cold water to stop the cooking. This keeps them springy, not soggy. Shake dry and set aside.

    2. Marinate the chicken.

    Place the thinly sliced chicken breast in a bowl. Add 1 teaspoon of light soy sauce, 1 teaspoon of cornflour, and a dash of sesame oil. Toss to coat every strip. This quick marinade adds flavour and creates that soft, velveted chicken texture when cooked hot.

    3. Heat the wok.

    Place your wok or frying pan over high heat and leave it until it starts to smoke. Add 1 tablespoon of neutral oil and swirl to coat. You want the surface hot enough to sear fast and hard.

    4. Sear the chicken.

    Add the marinated chicken in a single layer. Let it sit undisturbed for 60 seconds to form a golden crust, then stir-fry for another 2 minutes until cooked through and lightly charred at the edges. Remove to a clean plate and keep warm.

    5. Stir-fry the veg.

    In the same wok, add a little more oil if needed. Throw in the sliced onion, shredded cabbage, and julienned carrot. Stir-fry quickly for 2 minutes until vibrant, slightly softened but still crisp. Work fast — this is all about heat and movement.

    6. Return the chicken.

    Add the seared chicken back into the wok. Stir everything together — juices, char, and veg all need to blend before the noodles go in.

    7. Add the noodles and sauce.

    Toss in the cooled, drained noodles. Splash in 1 tablespoon of dark soy, 1 tablespoon of oyster sauce, and a pinch of white pepper. Stir-fry hard for another minute. Use tongs or a spatula to lift and toss the noodles high, coating everything in sauce and catching that wok heat.

    8. Finish strong.

    Once everything’s hot, slick, and smoky, kill the heat. The noodles should be glossy, the veg still bright, and the chicken juicy. Don’t let it dry out — serve fast and fresh.

    Serving tips

    Serve straight from the wok into warm bowls. Top with sliced spring onion or toasted sesame seeds for crunch. Want heat? A drizzle of chilli oil or a spoonful of crispy chilli in oil goes nuclear. Pair with cold beer, sparkling water, or iced green tea. Got leftovers? Fry an egg and throw it on top the next day — breakfast sorted.

    Chef’s notes

    Noodles matter. Use medium egg noodles — not vermicelli, not ramen. Dried noodles work best here. Boil, rinse cold, and let them sit for 5–10 minutes to dry slightly before stir-frying.

    Chicken cut right. Slice across the grain into thin strips for quick, even cooking. Breast works well here for clean flavour, but thighs add richness if you want it darker.

    High heat only. Wok cooking is fast and furious. Preheat the pan properly or you’ll steam instead of sear. If your hob’s weak, cook in smaller batches to maintain heat.

    Marinade magic. The cornflour locks in the moisture and helps the soy cling. Don’t skip it — it’s the backbone of that takeaway texture.

    Mix it up. Add bean sprouts, pak choi, or sliced peppers if you want more veg. Prawns or tofu make great swaps for the chicken. Going vegetarian? Replace oyster sauce with mushroom sauce or hoisin.

    Batch prepping? Slice all veg and meat in advance. Par-boil noodles and toss with oil to prevent sticking. The actual cook takes under 10 minutes — be ready before the heat hits.

    Final thought

    This chow mein isn’t about convenience. It’s about control. It’s heat, speed, and precision locked into a bowl. No plastic containers. No MSG fog. No waiting. Just glossy, smoky, sizzling noodles you cooked yourself — louder, hotter, and slicker than any takeaway can handle. When the wok’s this hot, the only thing fake is pretending you’ll save some for later.

    Health stats (per serving)

    Each serving comes in around 2,150kJ (515kcal), with 18g of fat, 3.5g saturates, 4g of sugars, and 1.9g of salt. You’ll also get 44g of carbohydrates, 31g of protein, and 4.2g of fibre — a balanced, protein-rich meal that fuels hard without feeling heavy.

    Disclaimer

    Every effort has been made to ensure the accuracy and clarity of this recipe. However, all individuals are responsible for verifying the ingredients, techniques, and methods they use. Always check packaging labels for the most up-to-date information regarding allergens, cross-contamination risks, and suitability for specific dietary needs, including gluten-free, nut-free, dairy-free, vegetarian, or vegan requirements.

    Nutritional information provided is estimated for guidance only and may vary depending on portion size, specific brands, or substitutions used. It should not be relied upon as medical or nutritional advice. If you have any allergies, intolerances, medical conditions, or dietary concerns, consult a qualified health professional before preparing or consuming any recipe on this site.

    By following this recipe, you acknowledge that you do so at your own risk. The site, its writers, and contributors are not liable for any adverse reactions, ingredient misinterpretations, or accidents in the preparation or consumption of any dishes.

    For full details, please refer to the site’s complete disclaimer and terms of use.

  • Chicken Tikka Masala

    Chicken Tikka Masala

    This is the king of curry night — a rich, fiery, unapologetically creamy bowl of indulgence that doesn’t just rival your local takeaway, it steamrolls it. This chicken tikka masala is the real deal. Bold. Smoky. Deeply spiced. It’s the kind of dish that silences a table and has everyone scraping the last streaks of sauce with torn bits of naan.

    You’re taking juicy chicken thighs, marinating them in yoghurt and spice until they’re packed with flavour, then grilling or searing until they char like tandoor-fired meat. That’s the base. Then you build the sauce — a slow-fried onion base with ginger, garlic, turmeric, and heat, simmered in passata until thick and deep, finished with a swirl of cream that turns it luscious and silky.

    The key here isn’t complexity — it’s control. Timing the marinade. Balancing the spices. Letting the sauce reduce until it clings to the chicken like velvet. One bite and you’ll realise why takeaway menus should fear home kitchens.

    This is how you do comfort food properly. Rich, spiced, and totally dripping with flavour — all for a fraction of what you’d pay at the curry house. Fakeaway? No. This is the main event.

    INGREDIENTS

    (Serves 4)

    For the marinade and chicken:

    500g boneless, skinless chicken thighs, cut into chunks 150g plain yoghurt (full-fat for best flavour) 1 tablespoon lemon juice 1 tablespoon ginger-garlic paste 1 teaspoon ground cumin 1 teaspoon garam masala 1 teaspoon smoked paprika ¾ teaspoon fine salt

    For the sauce:

    2 tablespoons vegetable oil 1 large onion, finely chopped 1 tablespoon ginger-garlic paste 1 teaspoon ground turmeric 1 teaspoon ground coriander 1 teaspoon chilli powder (adjust to taste) 300g passata 100ml double cream 1 teaspoon caster sugar Salt, to taste

    To serve:

    Cooked basmati rice Warm naan bread Fresh coriander (optional)

    EQUIPMENT NEEDED

    Large bowl for marinating Griddle pan, frying pan, or grill Large saucepan Spatula or wooden spoon Chopping board and sharp knife Mixing spoons Measuring spoons

    STEP-BY-STEP METHOD

    1. Marinate the chicken

    Start with the marinade. In a large bowl, mix together the yoghurt, lemon juice, ginger-garlic paste, ground cumin, garam masala, smoked paprika, and salt. Stir until smooth and fragrant. Add the chicken pieces and toss to coat completely.

    Cover and leave to marinate in the fridge for at least 30 minutes. Longer is better — 2 hours is ideal, overnight if you’ve got time. The yoghurt tenderises, the spices penetrate, and the lemon adds brightness.

    2. Sear or grill the chicken

    Once marinated, remove the chicken from the fridge and let it sit at room temperature for 10 minutes — you want even cooking, not fridge-chill on hot metal.

    Heat a griddle or large frying pan over high heat. Brush with oil. Sear the chicken in batches for 3–4 minutes per side until you get a solid char. You’re not cooking it through entirely — just building that smoky, blistered exterior. Transfer to a plate and set aside.

    Alternatively, grill the chicken under a hot grill for about 8 minutes, flipping halfway. Whatever you do, don’t crowd the pan. You want sear, not steam.

    3. Make the masala sauce

    In a clean saucepan, heat 2 tablespoons of vegetable oil over medium heat. Add the finely chopped onion and cook low and slow for about 8–10 minutes, stirring regularly. You want deep golden colour, not burnt bitterness.

    Once the onions are soft and caramelised, add 1 tablespoon of ginger-garlic paste and stir for 1 minute until it sizzles and becomes fragrant. Then add the turmeric, ground coriander, and chilli powder. Fry for another 30 seconds — the spices should darken slightly and start to stick. That’s where the magic starts.

    4. Add the tomato and simmer

    Pour in the passata. Stir to combine everything, scraping up any bits stuck to the bottom of the pan. Season with a pinch of salt. Bring it to a gentle simmer and let it reduce for 10 minutes, uncovered. You want the sauce to thicken and intensify — look for the colour to deepen and small oil bubbles to appear around the edges.

    5. Finish with cream and chicken

    Once the sauce has reduced and smells like it means business, add the cooked chicken pieces and any resting juices. Stir to coat fully.

    Now pour in the double cream and the teaspoon of sugar. Stir gently until the sauce turns a rich orange-pink. Simmer for another 5 minutes on low heat so the flavours marry and the chicken finishes cooking through.

    Taste and adjust seasoning — a pinch more salt or sugar depending on your preference. You’re looking for a balance of heat, depth, and creaminess.

    6. Serve hot

    Spoon the chicken tikka masala into bowls. Serve with hot basmati rice and soft naan to mop up the sauce. If you like, scatter with fresh coriander for a fresh herbal lift.

    SERVING TIPS

    Serve immediately while hot and bubbling. This dish is all about texture — tender chicken, velvety sauce, fluffy rice, and warm, chewy naan. Don’t skip the carbs — this sauce begs to be scooped. If you’re feeding a crowd, serve family-style with rice in one bowl, curry in another, and naan stacked warm and ready.

    Got leftovers? They’ll taste even better the next day. The flavours deepen overnight — just reheat gently with a splash of water or cream to loosen.

    CHEF’S NOTES

    The chicken:

    Chicken thighs are non-negotiable. Juicy, flavourful, and forgiving — perfect for high-heat cooking and slow sauce simmering. If you insist on breast, cut the cooking time in half or you’ll end up with rubber.

    The marinade:

    Yoghurt tenderises the chicken and adds tang. Spices bloom in the acidity. Don’t skip the resting time — 30 minutes minimum to let the flavour sink in. Overnight? That’s when the magic really happens.

    The sauce:

    Take your time frying the onion and spices — this is where depth comes from. Don’t rush or you’ll miss that roasted, aromatic base that makes tikka masala what it is.

    The tomato:

    Passata gives you smoothness and richness. If using chopped tomatoes, blitz them first — texture matters here. A splash of water helps thin it if it gets too thick before the cream goes in.

    The cream:

    Double cream is what gives this dish its iconic velvety finish. You can use single cream or coconut milk in a pinch, but don’t go light if you want indulgence.

    Make it spicy:

    Add green chillies to the sauce for more fire. Or serve with a side of mango chutney and pickled red onion to balance the heat.

    Make it vegan:

    Swap the chicken for roasted cauliflower or tofu, use a coconut yoghurt marinade, and finish with coconut cream. Same technique, same depth — totally plant-based.

    FINAL THOUGHT

    This is not a watered-down curry house knock-off. This is how you make tikka masala count — rich, fiery, layered with spice and smoky depth. It’s food that hits hard and hugs after. And when you get it right, you’ll wonder why you ever paid twenty quid for the privilege of something half as good.

    It’s bold. It’s messy. It’s indulgent. And it’s yours — on demand, whenever the craving strikes. That’s not a fakeaway. That’s power.

    HEALTH STATS (per serving, without rice or naan)

    Energy: around 2800kJ (approx. 670kcal)

    Fat: 42g

    Saturates: 17g

    Sugars: 9g

    Salt: 1.6g

    Carbohydrates: 15g

    Protein: 38g

    Fibre: 3g

    DISCLAIMER

    Every effort has been made to ensure the accuracy and clarity of this recipe. However, all individuals are responsible for verifying the ingredients, techniques, and methods they use. Always check packaging labels for the most up-to-date information regarding allergens, cross-contamination risks, and suitability for specific dietary needs, including gluten-free, nut-free, dairy-free, vegetarian, or vegan requirements.

    Nutritional information provided is estimated for guidance only and may vary depending on portion size, specific brands, or substitutions used. It should not be relied upon as medical or nutritional advice. If you have any allergies, intolerances, medical conditions, or dietary concerns, consult a qualified health professional before preparing or consuming any recipe on this site.

    By following this recipe, you acknowledge that you do so at your own risk. The site, its writers, and contributors are not liable for any adverse reactions, ingredient misinterpretations, or accidents in the preparation or consumption of any dishes.

    For full details, please refer to the site’s complete disclaimer and terms of use.